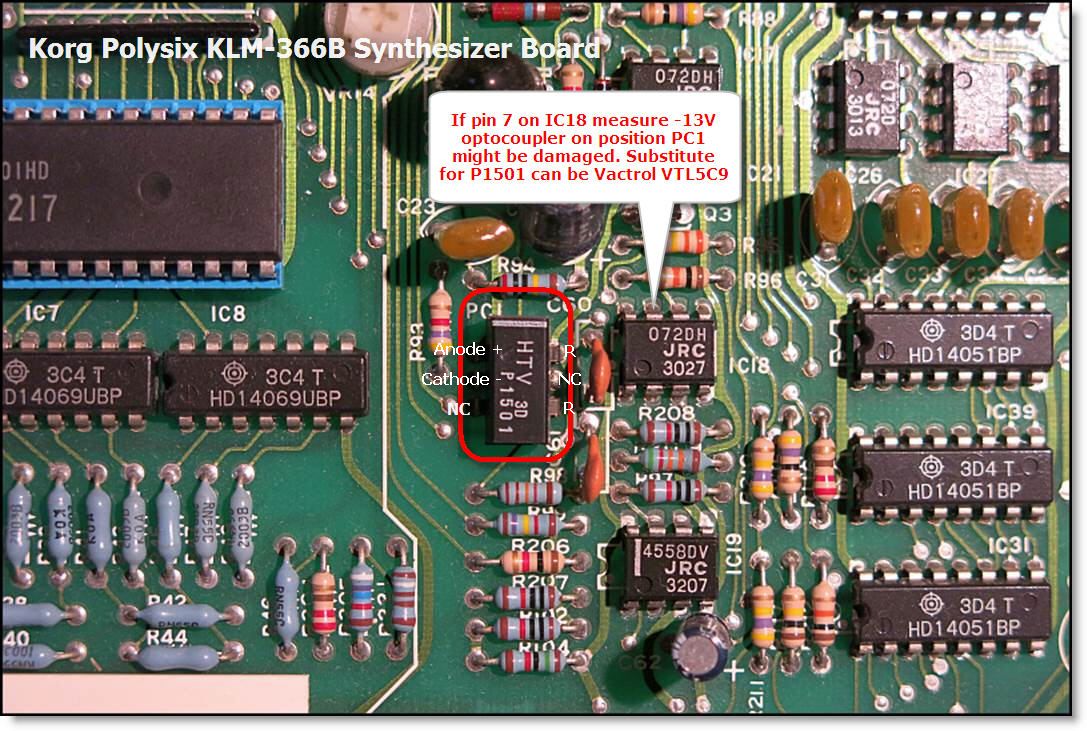
It has been days since I’ve replaced the infamous PC1 photo isolator with a VTL5C9. Although I can read out what seems to be correct measurement around the corresponding circuit I still can’t play my lovely Polysix. It’s been standing there with its lid open teasing me with all its variable resistors and out of tune notes. This post is partly an assembly of my notes making head from tails working this beast into a musical instrument again.
Stefan Huebner talks about the PC1 opto coupler in his blog post
When official service manual fails you
First thing fist. DO NOT UNDER ANY CIRUMSTANSES TURN ANY TUNING VR before you have tried playing the synth after a successful repair. But if you are reading this I guess this advice is probably coming your way too late? Yeah, like you I also read the instruction telling me to start with centering all VR’s. And why not, this analog synth is 30 years old and surely in need for a recalibration. Only problem with this instruction is that nearly every setting for the tuning VR’s are interconnected. If we turn one knob we also move the reference for several other adjustment points. It can take forever to get adjustments into a ballpark where we can fine tune from.
If you have adjusted any of the common tuning knobs VR1, VR2, VR3, VR14, VR15 but know for sure you have VR10 and VR11 on one of the voices untouched try to tune the common VR’s back to a working position with this voice channel as reference.
Johannes (member on the yahoo polysix mailing list) have recommended to first tune one single channel on the Polysix. I can tell for sure that this is a sane advice. But I will also tell you that at some point you will fail to check if D10 is lid on the intended voice unit. I’ve lost count on how many times I’ve turned the wrong VR. Or more often, - correct VR, but have the wrong voice playing. This project once again made me understand my love for monophonic synthesizers.
A song in C
After banging all the C keys to my ears bleed I realized there is no Grammy on my way and decided some diversity was needed. After some testing I found that playing the A key at 220Hz made adjusting the middle reference on VR15 much easier.
I also early on realized I don’t need to hear the synth play while tuning which made room for some nice and calming music on my stereo while twisting variable resistors and repetitive pressing A and C keys.
4 octaves
An important fact for success is to understand the graph listed under the tuning section in the service manual. Its labeled “PS-6 VCO octave deviation standards at the final inspection at our factory”. What this essential tells us is that we will probably not be able to tune P6 over more than 4 octaves.
Failing to read and understand this drained yet another battery in my blue Peterson Stomp while trying to stretch the VCO interval longer than even the designers tried to do.
Tools
Although the Peterson Stomp set to EQU Normal Chromatic Tuning is great for accurate tuning I felt the need for another tool.
Oscilloscope or frequency counter would be perfect but working on a budget I found that my PC sound card connected directly to TP-1 SIG OUT was able to trigger the free version of 'Visual Analyzer 2011'.
Polysix VCO drift a few cents when playing. So to simplify readings I used the 'Statistics' function on the frequency counter. Just remember to press 'Reset' when changing key. If you already have a decent software tuner installed that can show frequency I guess you are better off with that tool.
Sengpiel Audio has an excellent cent to frequency calculator here at http://www.sengpielaudio.com/calculator-centsratio.htm With this calculator I made the reference table below. What you see marked in green are all valid factory values. When you compare these numbers with the reverence column you understand how hard it is to tune this synth with a 0.1 cent precision strobe tuner. Also note that max frequency range on a typical instrument tuner often are limited. Peterson Stomp tuning range is 8-1975Hz (A#5 in this setting) which I accidently made to a useful range the way I ended up tuning the synth.
| Key | Hz ref A=440Hz | 1 cent | 5 cent | 10 cent | my result |
|---|---|---|---|---|---|
| C0 | 32.70325 | 32.722 | 32.798 | 32.893 | 32.81 |
| C1 | 65.4065 | 65.444 | 65.596 | 65.36 | |
| C2 | 130.813 | 131.191 | 130.55 | ||
| C3 | 261.626 | 262.383 | 261.67 | ||
| C4 | 523.252 | 523.554 | 523.19 | ||
| C5 | 1046.504 | 1047.109 | 1049.531 | 1052.566 | 1047.27 |
| C6 | 2093.008 | 2094.217 | 2099.062 | 2105.133 | 2096.22 |
| C7 | 4186.016 | 4188.435 | 4198.123 | 4210.265 | 4185.34 |
With my new reference chart at hand, and the frequency counter hocked up I’m ready to start from scratch for the x time. Please note that all VR’s in my P6 has been turned at some time and I now start from center position on all knobs.
Here is how I finally got around all those tuning knobs
Real simple, but in reality the practical implementation is rather more complicated as adjusting one of the variable resistors also moves the reference value for the other two. Every single time you twist one of them!
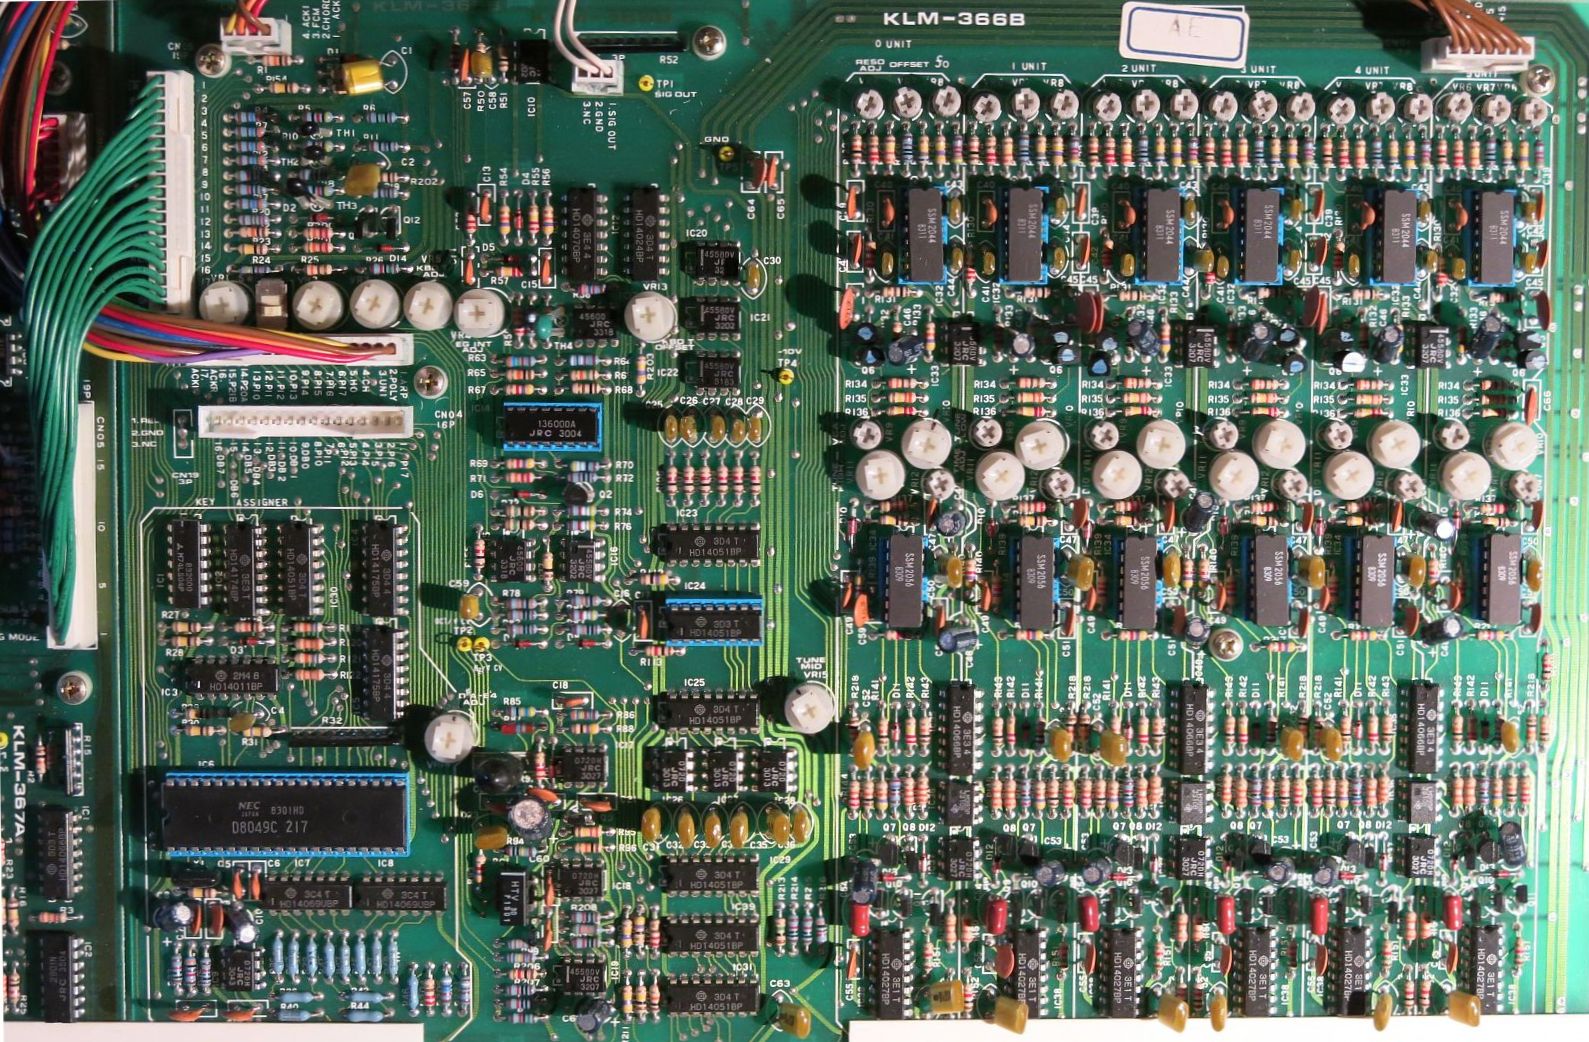
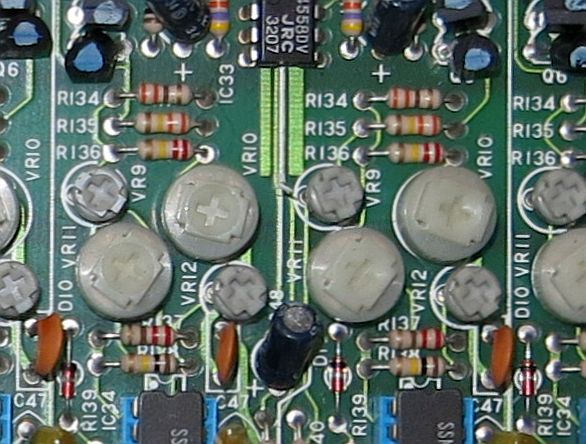
All VR, switches and Test Point (TP) are located on KLM366 PCB
- Hock up the frequency counter to TP-1 SIG OUT and TP-5 GROUND. And/Or a precision tuner to LINE OUT.
- Turn on the Polysix and leave it on for minimum 10 minutes before turning any VR. Better say 30 minutes.
- Adjust knobs on front panel to “Normal Setting” as described in the service manual (SM from now on). All adjustments are done with VCO OCTAVE set to middle position at 8 foot and TUNE knob at center position.
- Set switch SW1 to Back position.
- Center VR1. If possible do not turn VR2 and VR3. But if you know they’re already out of position center them now.
- Center VR10 and VR11 on voice channel Unit 0
- Play C5 repeatedly until LED D10 on Unit 0 is lid. Adjust VR11 on Unit 0 to 0 cent
- Play C1 repeatedly until LED D10 on Unit 0 is lid. Adjust VR1 (not VR10) to 0 cent
- Play C5 repeatedly until LED D10 on Unit 0 is lid. Adjust VR11 on Unit 0 to 0 cent. You want VR11 to obtain 0 cent near center position. If it its far out either way adjust VR2. This ensure you have some head room when it’s time to adjust the rest of the voices.
- Play C1 repeatedly until LED D10 on Unit 0 is lid. Adjust VR10 on Unit 0 to 0 cent. You want VR10 to obtain 0 cent near center position. If it its far out either way adjust VR3. This ensure you have some head room when it’s time to adjust the rest of the voices.
- Play A2 (220Hz) repeatedly until LED D10 on Unit 0 is lid. Adjust VR15 to 0 cent. If you’re lucky VR15 don’t need adjustment. If it does you are now going into a loop…
- Repeat step 3-1 to 3-3 until you have all keys from C1 to C5 at 0 cent. When you’re starting to get theses setting close verify that VR14 is tuned to a half a step between D#4/D4
You might noticed how VR10, VR11 and VR 15 interact. Try to repeat Step 3-1 to 3-3 in different orders. On my unit I noticed that VR 15 would interact a little more on VR11 (key C5) than on VR10 (key C1). You will experience that you need to balance your adjustment and not take it to 0 cent until you have all three notes (C1, A2, C5) almost in tune. I found it easier to fist have both C1 and C5 a few cent sharp and adjust A2 at 0 cent as reference. Then stretch the difference at both ends.
- Play C5 repeatedly until LED D10 on Unit x is lid. Adjust VR11 on Unit x.
- Play C1 repeatedly until LED D10 on Unit x is lid. Adjust VR10 on Unit x.
- Repeat step 4-1 and 4-2 until both C5 and C1 are 0 cent.
- Check that notes between C1-C5 are close to how Unit 0 performs.
- Set OCTAVE to 16 foot and check that bottom C0 is within 10 cents
- Set OCTAVE to 4 foot and check that top C7 is within 10 cents
- Set SW1 to Front position
NOTE: If you are not able to adjust VR10 or VR11 in step 4-1 or 4-2 course the VR are at one of its ends you need to go back to step 3-1 and 3-2. But this time use Unit x with the problem as reference to adjust VR2 and VR3.
Congratulation! You have now successfully tuned your Polysix to fabric specification. Now it’s finally time to have some real fun playing this great instrument.
I hope this information in some way can help someone out there. I nearly got lost in this project and welcomed any distraction that could calm me down in between battles. Now playing the beast it was all worth it. Seriously, I can’t remember doing anything more frustrating since paying my former mechanic for repairing our car breaks for the third time in the same year.
Comments
Your comment are welcome
stephen    2020-09-12 22:59:44
  Thanks to share, your method works!..
I've tried hours of my ways..
Note, if there is one voice missing SSM ic or ic's - then
you won't be able to align the other voices..
There will be a overall effect shifting-and modulating
everything.
I've changed VR1, 2, 15 etc with multi turn pots, easier.
Good work....Thanks.
Julian    2019-10-04 04:35:45
Thank you so much for sharing this, you saved me from going insane with my polysix.
Hans    2018-10-05 12:11:51
Thanks Graham!

My inital notes and memory are long gone in a PC upgrade and brain corotion. To be hounest I'm not entaerly sure what VR14 do anymore.

But trying to deciphering my own wording I'm guessing VR14 have an balancing purpose where I found it to need a range approx 1/4 note at the higher register to cover all six voices.
Graham    2018-10-05 08:55:20
This is great, the Service Manual was not making a lot of sense to me.

Just one question:

"When you’re starting to get theses setting close verify that VR14 is tuned to a half a step between D#4/D4"

I'm not entirely sure what that means, what note do you play? What is that pot actually doing? It's not even referenced in the Service Manual?

Thanks.
Andreas    2018-08-29 21:10:40
Thank you for these simple, yet thorough, instructions. They were really easy to follow and I think you saved me a couple of hours.

If I might suggest one improvement, it would be that you added an image of the keyboard and point out exactly which keys you mean when you write C1, C5, A2 etc, and also the frequencies that they should have. If the Polysix is completely out of tune, sometimes you don't even know which A to aim for...

Best regards and thanks again
Stephan    2018-08-03 13:49:46
Just wanted to say thank you for providing this valuable information!
Had exactly the same problem with an untunable polysix. Pin 7 on IC 18 on KLM 366 showed the -13 Volts.
Exchanged the PC1 photo isolator with a VTL5C9. Works like a charm.